
You can start to design a flyer at home using Microsoft Words.
Here are some basic steps to design a commercial flyer using Microsoft Words 2007 (same concept for Words 97-2003 too)
For enquiry, you can contact me at 9066 0350.
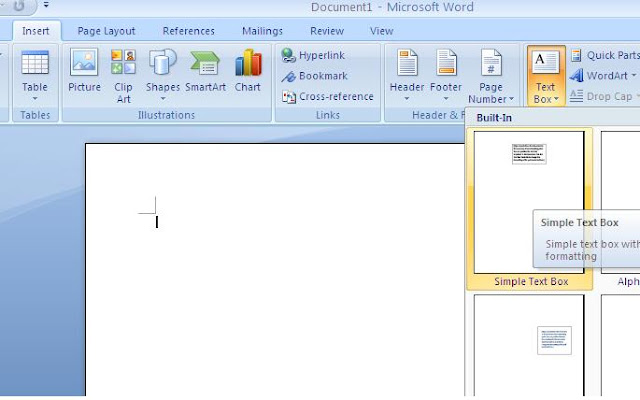
1st step: insert a text box into your blank document.
(text box is to enable moving your picture easier later on)
2nd step: insert a picture from your computer into the text box you have just created.

3rd step: this example i have chosen to insert a picture of my company logo from one of my folder named AdvBiz Pics For Classifieds

4th step: once picture is inserted into the text box , you can freely move the picture within text box around by "left-click & hold" your mouse to the positions you desire.
Next u can also insert another text box below it to include your ads.

5th step: make the text box "invisible" by double left-click it Shape Outline> No Outline.
The outlines of text box will be gone and hence the picture looks as if it is alone.

6th step: start moving the single picture by left-click and holding your mouse to the place you want the picture to stay.

8th step: insert a Triangle by going to Insert > Shapes > drop down menu look for Basic Shape: Triangle

9th step: you can rotate the Triangle and fill it with color. Place it in the top left-hand corner or anywhere you think its nice.

10th step: to make the flyer nicer, you can also insert a Word Art.

11th step: after typing in the Word Art, it will appear on the top of your document

Here are some basic steps to design a commercial flyer using Microsoft Words 2007 (same concept for Words 97-2003 too)
For enquiry, you can contact me at 9066 0350.
1st step: insert a text box into your blank document.
(text box is to enable moving your picture easier later on)


3rd step: this example i have chosen to insert a picture of my company logo from one of my folder named AdvBiz Pics For Classifieds

4th step: once picture is inserted into the text box , you can freely move the picture within text box around by "left-click & hold" your mouse to the positions you desire.
Next u can also insert another text box below it to include your ads.

The outlines of text box will be gone and hence the picture looks as if it is alone.

6th step: start moving the single picture by left-click and holding your mouse to the place you want the picture to stay.


11th step: after typing in the Word Art, it will appear on the top of your document

These are just some basic steps to designing a flyer using Microsoft Words. Hope you enjoy this blog.
If you have any design flyer enquiry, you can contact me at 9066 0350.
Thank you for your time.
No comments:
Post a Comment